• Home
    • About
      • Contact
  • Shop
    • Home Decorating Accessories
    • Tiered Tray Kits
    • Holiday Home Decor
    • Holiday Ornaments
  • DIY Shop
    • Unfinished Tiered Tray Kits
    • Unfinished Holiday DIY Decor
  • DIY | Projects
    • For The Home
    • Organization
    • Gift Ideas
    • Holidays
      • Valentine’s Day
      • Spring
      • 4th of July
      • Halloween
      • Thanksgiving/Fall
      • Christmas
    • Weddings
    • For The Outdoors
    • Repurposed/Upcycled
    • For Kids
    • Crafts
    • Chalk Paint
    • My Favorites
      • Gift Guides
      • Shop
      • My Keto Journey
        • Easy Keto Meal Plans
        • Recipes
  • Home Inspiration
    • Home Renovations
      • Lake House
      • Before & Afters
    • Kitchens
    • Bathrooms
    • Painting
    • Exterior
    • Design & Decor
    • Lighting
    • Accessories
    • Tips & Tutorials
    • Rekindled Spaces
      • Rekindled Spaces | Schedule a Consultation
      • Rekindled Spaces | Cabinet & Furniture Refinishing
      • Rekindled Spaces | Contact Us
      • Rekindled Spaces | Before & After Photos
    • Email
    • Facebook
    • Instagram
    • Pinterest
    • Twitter
    • YouTube

Diva of DIY

Window Treatment: How to Take Blinds from Cheap to Chic

Tweet
Share53
Pin6K
6K Shares

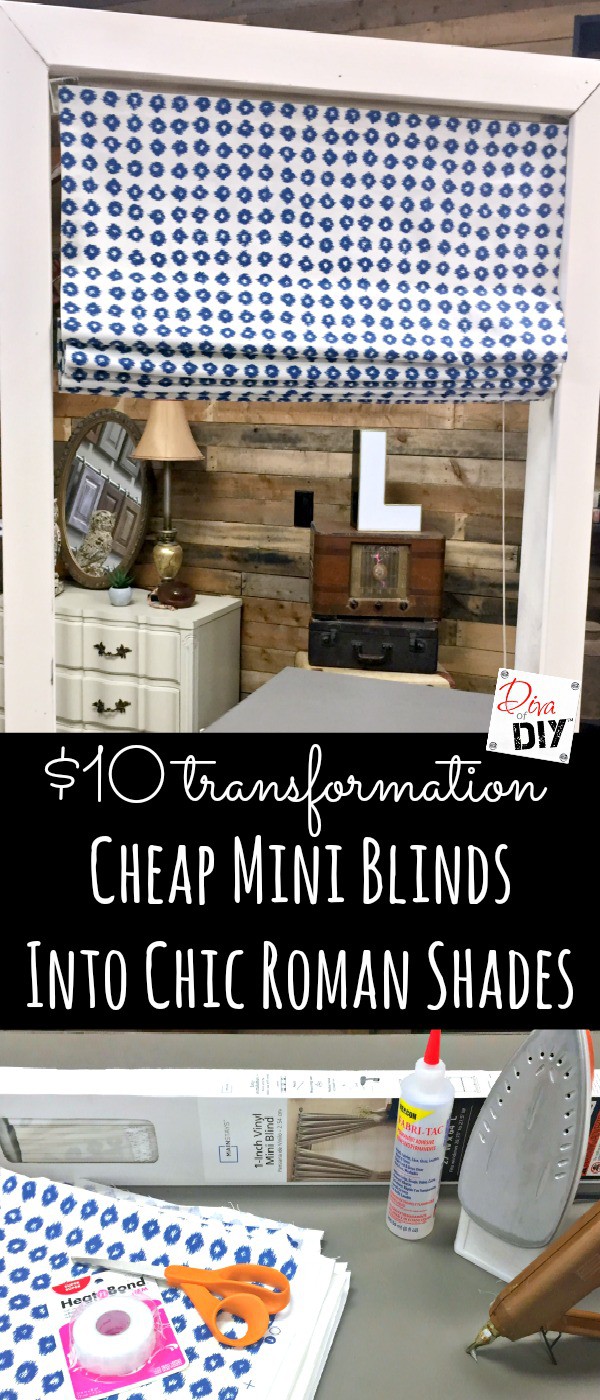
I am so excited to share this with you! This window treatment turned out better then I had even hoped! I had seen them pop up on Pinterest from time to time and I thought it might be time to give them a try. I don’t know if you had a Hancock Fabric close to where you live but they all went out of business a few months ago and so I loaded up on fabric to try it out! Who can resist a roman shade window treatment made out of a Walmart $5 mini blinds and 85% off fabric? Seriously this little beauty cost me less then $10!

Who says a fabric window treatment has to be expensive! Make these mini blinds into DIY roman shades. It's an easy project no sew window treatment project!

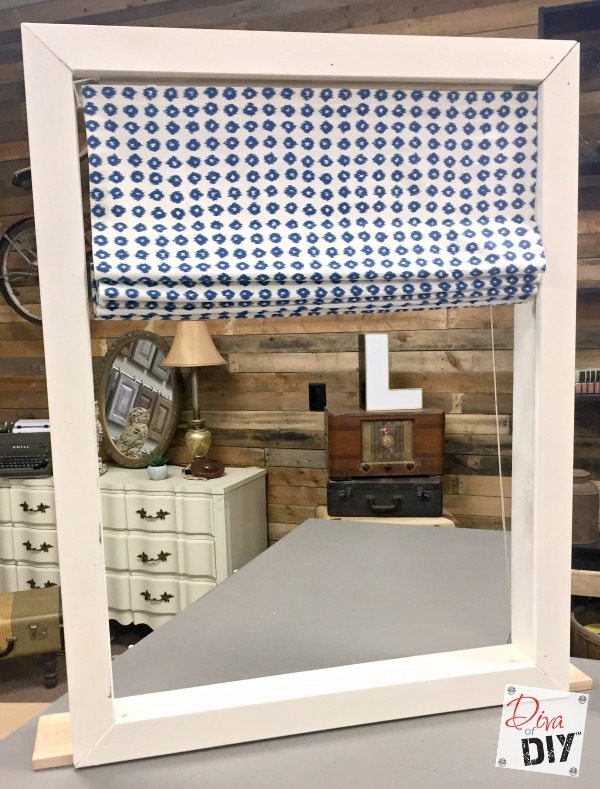
Like my little makeshift window? That’s how things work when you are trying to show it on TV! I thought I was pretty clever!

Who says a fabric window treatment has to be expensive! Make these mini blinds into DIY roman shades. It's an easy project no sew window treatment project!

This post contains affiliate links. If you buy something from clicking one of my links, I will get a commission from the sale. It will not cost you a penny more and allows me to keep sharing my ideas with you for free. You can see my full disclosure here. Thank you for supporting my blog!

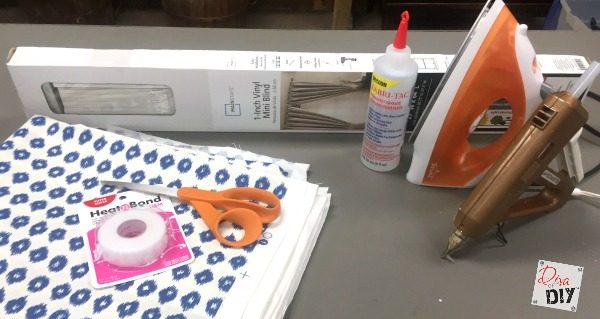
DIY Window Treatment Supplies:

  • Mini Blind the size of your window
  • Fabric of your choice – the amount depends on the window
  • Head n Bond Hem Tape
  • Iron
  • Scissors
  • Fabric Glue
  • Glue Gun
  • e6000

DIY Window Treatment Instructions:

Window treatment fabric:

Step 1) Measure your fabric leaving an extra inch on all sides, so your fabric should be 2″ longer and 2″ wider than your mini blind measurements for your window. This is for the seam allowance.

*Diva tip: You all know I do not sew, I can sew as long as it is just straight lines but it is not something I usually do. Because of that this project made me nervous. I am here to tell you, don’t worry. Just cut a small notch where your measurement is and rip the fabric. This will give you a straight line to work with.

Who says a fabric window treatment has to be expensive! Make these mini blinds into DIY roman shades. It's an easy project no sew window treatment project!

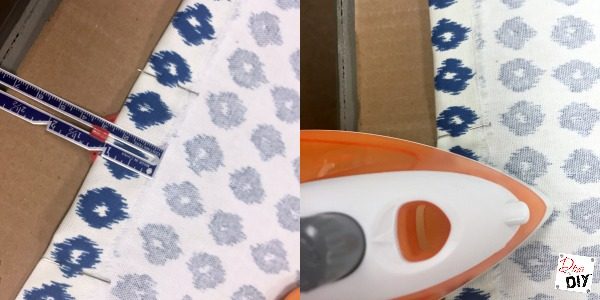
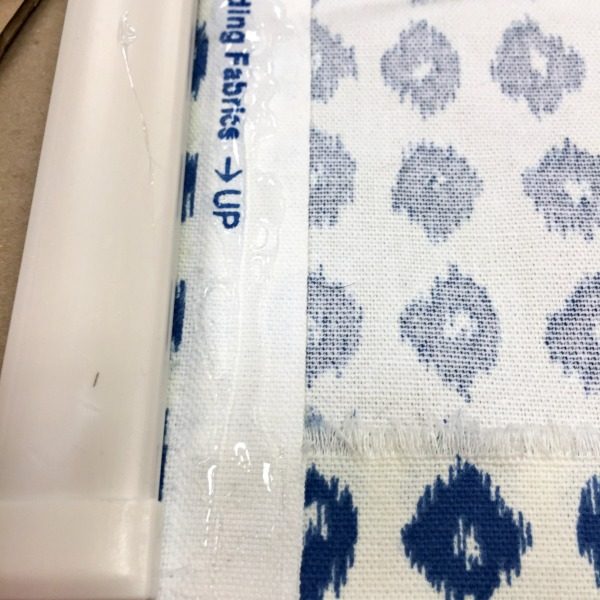
Step 2) Make your seam by folding in one inch all the way around the fabric and ironing it to give you a crisp edge. Do this on all 4 sides.

Who says a fabric window treatment has to be expensive! Make these mini blinds into DIY roman shades. It's an easy project no sew window treatment project!

Step 3) Put your Heat n Bond tape on the inside of the fold and following package instructions for the type of material you have, iron your seam down. That is all there is to it! At this point make sure all the wrinkles are out of your fabric! You now have your material ready for the shade!

Window Treatment Mini Blind:

Who says a fabric window treatment has to be expensive! Make these mini blinds into DIY roman shades. It's an easy project no sew window treatment project!

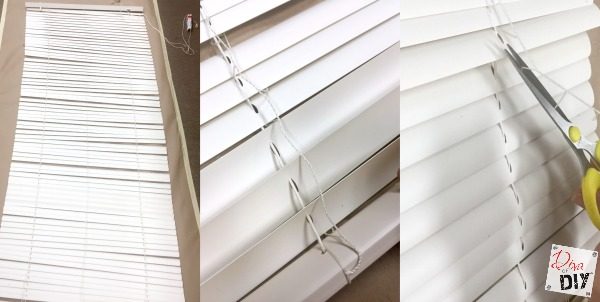
Step 1) Lay the mini blind flat.

Step 2) Cut off the ladder strings down the middle. These are the strings that open and shut the blades.

Step 3) Cut the ladder strings down both sides being careful not the cut the larger strings that pull the blades up and down.

Who says a fabric window treatment has to be expensive! Make these mini blinds into DIY roman shades. It's an easy project no sew window treatment project!

Step 4) Take the caps off the bottom of the blind and cut the knot to pull off the bottom.

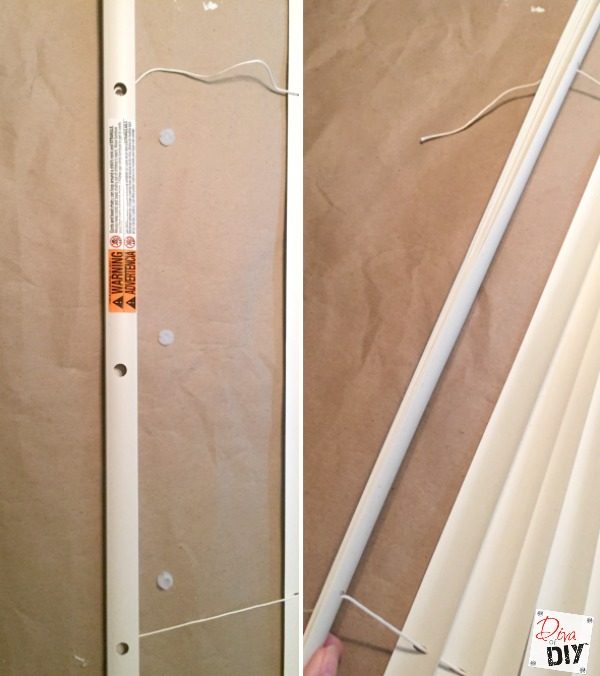
Step 5) Pull off extra blinds… well wait a minute you are probably saying, how many do I pull off? I may have jumped the gun on this step! Keep this in the back of your mind and keep reading…

Who says a fabric window treatment has to be expensive! Make these mini blinds into DIY roman shades. It's an easy project no sew window treatment project!

Step 6) The mini blind will have a hook that you attach the wand to that opens and shuts the blinds. You need to break that off or use wire cutters to cut it off.

Step 7) Now lay the mini blind face down on the fabric. (I was testing this when I took the picture, you will want to make sure to iron your fabric well to get out all the wrinkles)

Who says a fabric window treatment has to be expensive! Make these mini blinds into DIY roman shades. It's an easy project no sew window treatment project!

Step 7) Decide how far apart you want you fabric folds to be. The average is between 6-8″ apart.

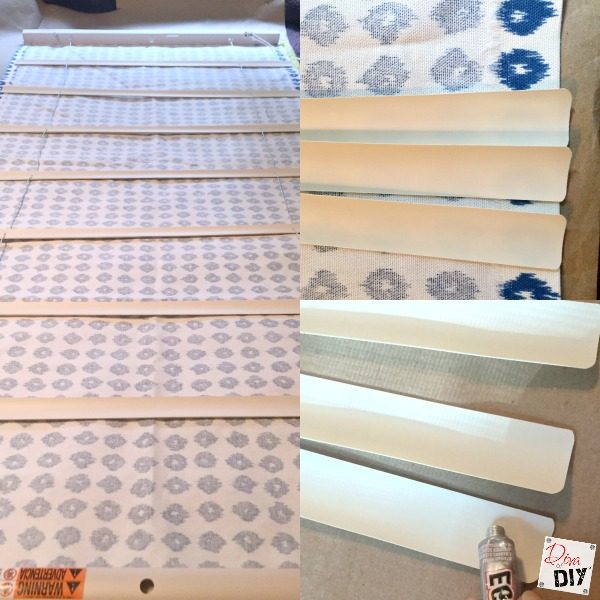
Diva tip: Because I used very cheap blinds the blind pieces themselves were flimsy so I used e6000 to glue 3 blinds together for each fabric fold. If you have stronger blinds this step may not be necessary.

Step 8) Measure out the blind spaces and slide off all the blinds you do not need. (yep that is the step 5 part)

Who says a fabric window treatment has to be expensive! Make these mini blinds into DIY roman shades. It's an easy project no sew window treatment project!

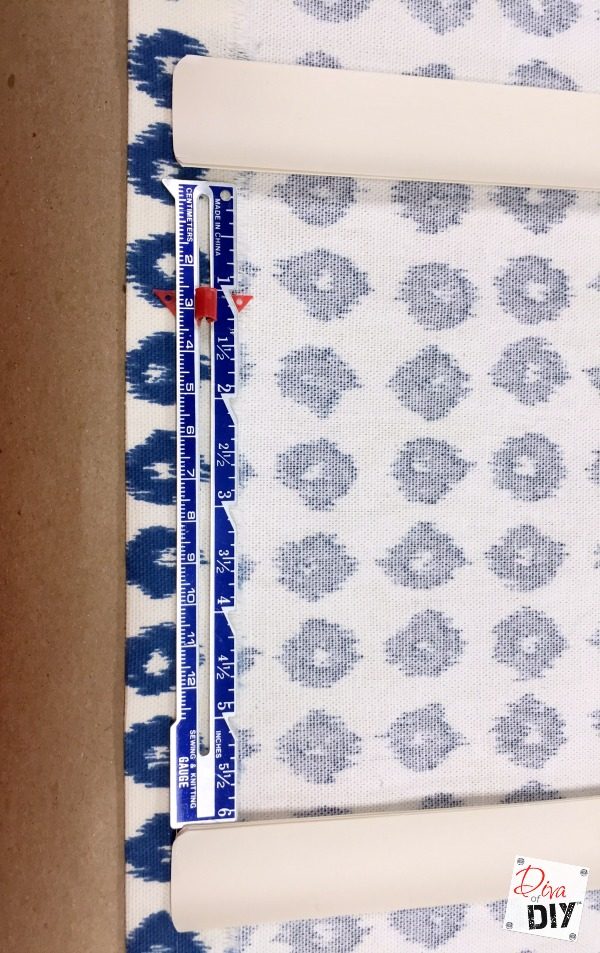
Step 9) Measure each blind to made sure it is in the place you want it.

Who says a fabric window treatment has to be expensive! Make these mini blinds into DIY roman shades. It's an easy project no sew window treatment project!

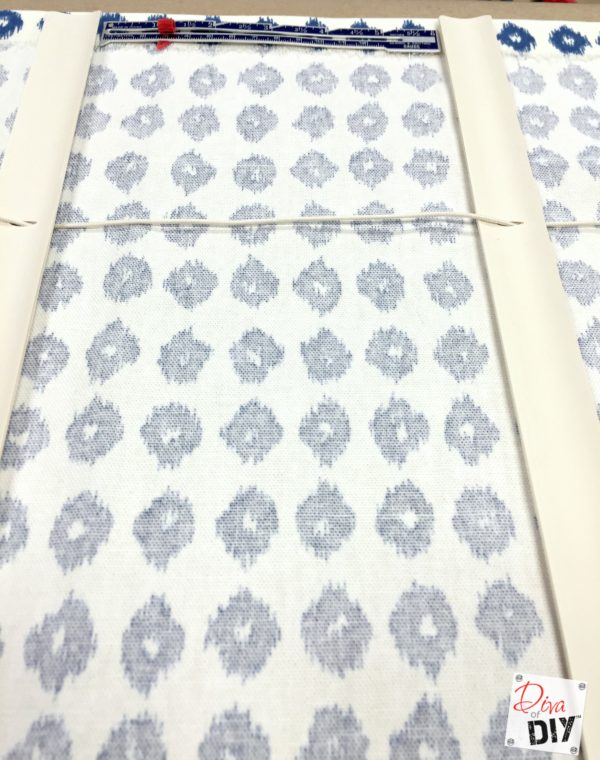
Step 10) Measure the other side to make sure the blind will be straight across.

Who says a fabric window treatment has to be expensive! Make these mini blinds into DIY roman shades. It's an easy project no sew window treatment project!

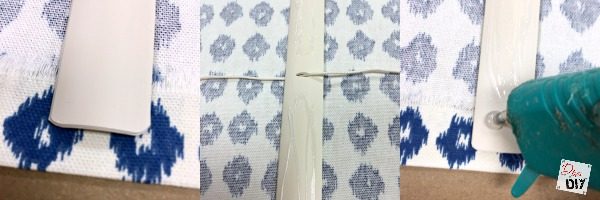
Step 11) Flip the blind so that the curve is up. This is the side you will want to glue.

Step 12) Put Fabric glue on the blade making sure not to put glue where the strings are. I also smoothed down the glue with the tip of the glue bottle to make sure there would not be any raised lines on the other side of the fabric.

Step 13) Put two small drops of hot glue on each end to help hold the blinds in place while the fabric glue dries.

Step 14) Flip the blind over onto the fabric and gently smooth the blind down on the fabric.

Who says a fabric window treatment has to be expensive! Make these mini blinds into DIY roman shades. It's an easy project no sew window treatment project!

Step 15) Put the strings back through the holes in the bottom of the blind and glue it to the end of the fabric making sure not to put glue where the strings are.

Step 16) Glue the top of the blind down to the top of the fabric, again not getting glue on the strings. You could do this part first, I just made sure it was lined up and did it last.

Who says a fabric window treatment has to be expensive! Make these mini blinds into DIY roman shades. It's an easy project no sew window treatment project!

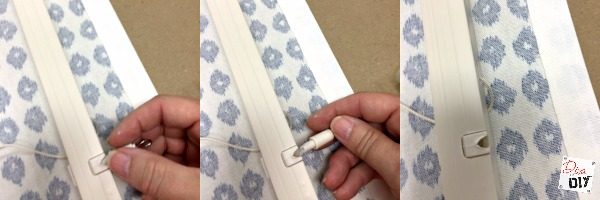
Step 18) Pull the strings tight and tie them off on the bottom.

Step 19) Push the string inside the bottom and replace the plastic caps.

Step 20) Hang your blind in your window and enjoy!

If you do not want the blinds showing from the outside or you want more light blocked out you can sandwich the blinds inside by adding a curtain lining piece to the back, basically doing the same thing from start to finish. Mine will be hanging to the backside of my house so I honestly didn’t think about it until I was writing this post.

Who says a fabric window treatment has to be expensive! Make these mini blinds into DIY roman shades. It's an easy project no sew window treatment project!My camera girl Sarah was impressed and ready to head home and make her own. She rents and can not hang things on the wall so she was excited to use this idea to add some personality to her apartment! I can’t wait to see how hers turn out!

Who says a fabric window treatment has to be expensive! Make these mini blinds into DIY roman shades. It's an easy project no sew window treatment project!

Each and everyone of you inspire me and I LOVE to see the work that you’ve created. Feel free to share with me on Instagram, Twitter or Facebook. And as always, be sure to follow Diva Of DIY on Pinterest and sign up for our FREE Newsletter to receive the latest projects delivered straight to your inbox!
If you like this project, Check out these:

Outdoor DIY Curtains are all the rage! These cheap and easy no sew drop cloth curtains with an industrial look make them the perfect project for your outdoor decor!

Cheap and Easy No Sew Drop Cloth Curtains

Cheap and easy Home Improvement DIY to add drama to builder grade baseboards by adding trim to your walls and painting the space between them.

DIY Dramatic Baseboards

Create the bathroom of your dreams with an inexpensive bathroom makeover that can easily be completed in a weekend with these 4 DIY bathroom ideas!

Quick Weekend Bathroom Makeover


Tweet
Share53
Pin6K
6K Shares

Blog// DIY | Projects// New on the blog4 Comments

Become an insider and never miss a post!

« Painting Furniture: Diva of DIY Chalk Mix Challenge
How to Make Decorative No Sew Outdoor Throw Pillows »

Comments

  1. Toni | Small Home Soul says

    08/30/2016 at 7:51 pm

    I love these, I've had these on my list to try for some time. I should have done this for my kitchen window so I can close them. Yours turned out great, love the fabric!
    Reply
    • divaofdiy says

      09/06/2016 at 10:13 am

      Thank you Toni! I liked the fabric when I saw it but am falling even more in love with it as I'm working with it! It makes me smile!
      Reply
  2. Sam @ Raggedy Bits says

    09/12/2016 at 1:10 am

    What a super fun easy project and so cheap! Can't wait to try these out! Love the fabric that you got also! What a bargin!
    Reply
    • divaofdiy says

      09/12/2016 at 11:51 am

      Thanks Sam! These are for Terri's guest bedroom. They should brighten up the space!
      Reply

Leave a Reply Cancel reply

Your email address will not be published. Required fields are marked *

Looking For Something?

Shop Amazon!

Do you struggle with choosing paint colors for your home?

Trying to select them off of small paint strip can be a daunting task.  DOWNLOAD THIS FREE E-BOOK full of professional tips for choosing the perfect paint colors…
THE FIRST TIME!

You have Successfully Subscribed!

Subscribe

Please don't make the same mistakes most DIYer's make

Are you considering painting your cabinets?  Download our free cabinet painting checklist to make sure you are painting your cabinets the right way!

You have Successfully Subscribed!

  • Email
  • Facebook
  • Instagram
  • Pinterest
  • Twitter
  • YouTube
Privacy

Tags

bathroom makeover ideas Chalk Paint Christmas christmas decor christmas ornament Craft Projects design tips easy keto recipes Fall decorating fixer upper furniture Furniture Rehabs Gift Ideas Halloween handmade holiday holiday decor Home Decor home renovations keto keto diet kids crafts kitchen makeovers lake house fixer upper Mother's Day Organization Outdoor painting paint party Pallet Projects pallet projects Pumpkins repurposed Repurposed & Upcycled Repurposed Projects Restaurant: Impossible Shopping Guides Thanksgiving upcycled Upcycled Projects Valentine's Day wood decor wood projects wood signs wreaths

Copyright © 2021 · Savory theme by Restored 316

Copyright © 2021 · Savory Theme on Genesis Framework · WordPress · Log in