• Home
    • About
      • Contact
  • Shop
  • DIY | Projects
    • For The Home
    • Organization
    • Gift Ideas
    • Holidays
      • Valentine’s Day
      • Spring
      • 4th of July
      • Halloween
      • Thanksgiving/Fall
      • Christmas
    • Weddings
    • For The Outdoors
    • Repurposed/Upcycled
    • For Kids
    • Crafts
    • Chalk Paint
    • My Favorites
      • Gift Guides
      • Shop
      • My Keto Journey
        • Easy Keto Meal Plans
        • Recipes
  • Home Inspiration
    • Home Renovations
      • Lake House
      • Before & Afters
    • Kitchens
    • Bathrooms
    • Painting
    • Exterior
    • Design & Decor
    • Lighting
    • Accessories
    • Tips & Tutorials
    • Rekindled Spaces
      • Rekindled Spaces | Schedule a Consultation
      • Rekindled Spaces | Cabinet & Furniture Refinishing
      • Rekindled Spaces | Contact Us
      • Rekindled Spaces | Before & After Photos
    • Email
    • Facebook
    • Instagram
    • Pinterest
    • Twitter
    • YouTube

Diva of DIY

Halloween Wreath: How to Make a Spooky Skull Wreath

Tweet
Share1
Pin155
156 Shares

I typically don’t care for scary Halloween decorations but I really enjoyed making this Halloween wreath. The combination of the open-back frame, the painted wood plaques and the skeletons look spooky but don’t completely creep me out. LOL

I typically wouldn't like my Halloween Wreath to be spooky but I couldn't resist when I found these plastic skulls & skeleton garland at the dollar store! Love the sizzix Trick or Treat plaque!

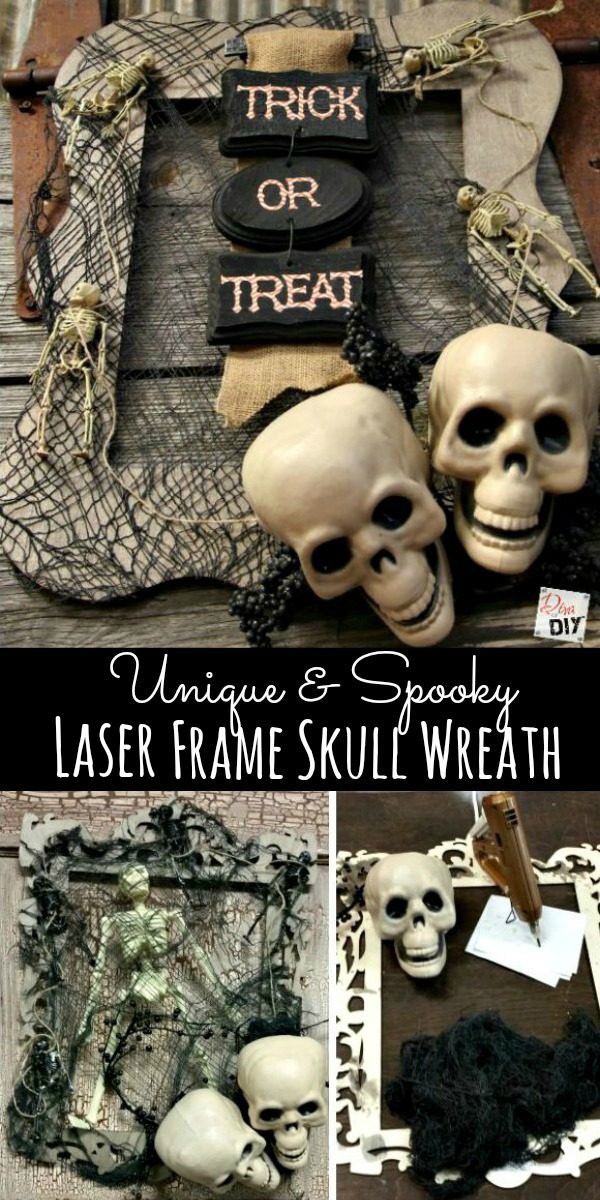
If you haven’t figured out by now…I am kind of a wimp when it comes to scary things.  I can’t help it…Skeleton heads are creepy! But I love the combination of using a laser wooden frame and the black mesh as the background for this non traditional Halloween wreath!

I typically wouldn't like my Halloween Wreath to be spooky but I couldn't resist when I found these plastic skulls & skeleton garland at the dollar store! Yep the dollar store!

This post contains affiliate links. If you buy something from clicking one of my links, I will get a commission from the sale. It will not cost you a penny more and allows me to keep sharing my ideas with you for free. You can see my full disclosure here. Thank you for supporting my blog!

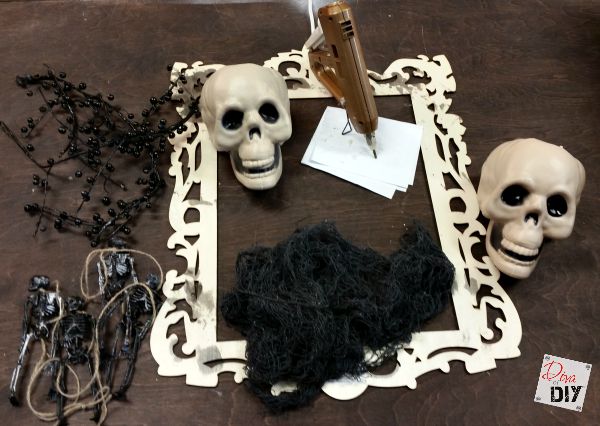
Spooky Halloween Wreath Supplies:

  • Open-back frame
  • Stain
  • Staining Pad
  • Black Spray Paint
  • Glue Gun
  • Black Netting
  • Skeleton Garland
  • Plastic skulls
  • 3 small wood plaques in different shapes
  • Leftover berry picks
  • Burlap Ribbon
  • Scrapbook Paper
  • Sizzix Die Cut Machine
  • Sizzix Die Cut

Do you follow the Diva of DIY on Youtube?

Video Tutorial for Step by Step Direction for a Spooky Halloween Wreath

Once you have the basic concept of making a wreath out of an open-back picture frame, your mind will begin to go crazy with ideas.

I typically wouldn't like my Halloween Wreath to be spooky but I couldn't resist when I found these plastic skulls & skeleton garland at the dollar store!

Isn’t this one super scary???  Instead of adding the wood plaques with the scrapbook letters, I placed another skeleton behind the netting so it appears trapped, the kids will love it!

Basic Steps for the Spooky Halloween Wreath:

Step 1) Stain or Paint the wooden Frame

Step 2) Arrange the black gauze on the frame. Once you have it where you like it glue it down in spots or Mod Podge it to the frame.

Step 3) Lay your accessories down and move them around until you have the look you want. 

Step 4) Glue the accessories down using hot glue.

Step 5) To hang your Halloween wreath you can either attach it to a wreath hanger by hanging it from the middle of the frame or hot glue burlap ribbon to the back and attach it that way.

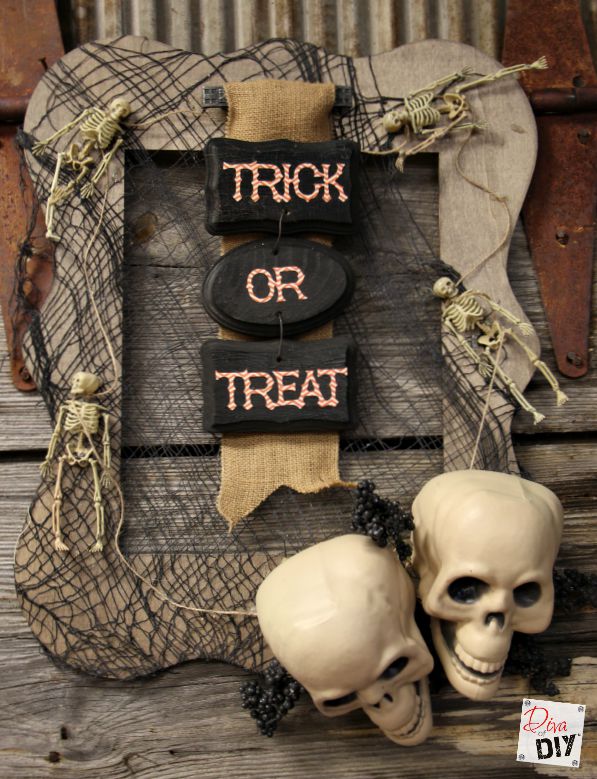
Trick or Treat Sign for Halloween Wreath:

Step 1) Paint your three small wooden plaques black.

Step 2) Drill holes in the plaques as you see in the picture. 

Step 3) Using wire attach the plaques together as show.

Step 4) Glue on your letters. I attached mine with Mod Podge so it will be sealed for outdoor use! You can see how I used my sizzix machine to do my letters here.

Step 5) Hot glue the plaques to a piece of burlap ribbon and attach it to the frame. If you do not have access to a drill you can always hot glue the plaques to the burlap without attaching them together as I did.

Have fun with it! I think that is why Halloween is so popular, there are no rules! If you notice, I hung my trick or treat sign by using an old drawer pull! Fun little additions like that are the icing on the cake!

I typically wouldn't like my Halloween Wreath to be spooky but I couldn't resist when I found these plastic skulls & skeleton garland at the Dollar Store!


Each and everyone of you inspire me and I LOVE to see the work that you’ve created. Feel free to share with me on Instagram, Twitter or Facebook. And as always, be sure to follow Diva Of DIY on Pinterest and sign up for our FREE Newsletter to receive the latest projects delivered straight to your inbox!

Looking for other DIY Ideas? If you like this project, check out these:

fall-wreath-1

How to Make a Fun Fall Frame Wreath

Love the look of boot socks but not the bulk or expense? These DIY no sew boot socks are the perfect solution! Grab some old sweaters and get started!

How to Make Boot Socks from Old Sweaters

boo-pumpkin-planter-feature

Make a BOO Pumpkin Planter


Tweet
Share1
Pin155
156 Shares

Blog// DIY | Projects// HalloweenLeave a Comment

Become an insider and never miss a post!

« Halloween Decorations: How to Make an Easy Countdown Calendar
Kids Halloween Craft: How to Make a Peek-a-Boo Pumpkin »

Leave a Reply Cancel reply

Your email address will not be published. Required fields are marked *

Looking For Something?

Shop Amazon!

Do you struggle with choosing paint colors for your home?

Trying to select them off of small paint strip can be a daunting task.  DOWNLOAD THIS FREE E-BOOK full of professional tips for choosing the perfect paint colors…
THE FIRST TIME!

You have Successfully Subscribed!

Subscribe

Please don't make the same mistakes most DIYer's make

Are you considering painting your cabinets?  Download our free cabinet painting checklist to make sure you are painting your cabinets the right way!

You have Successfully Subscribed!

  • Email
  • Facebook
  • Instagram
  • Pinterest
  • Twitter
  • YouTube
Privacy

Tags

bathroom makeover ideas Chalk Paint Christmas christmas decor christmas ornament Craft Projects design tips easy keto recipes Fall decorating fixer upper furniture Furniture Rehabs Gift Ideas Halloween handmade holiday holiday decor Home Decor home renovations keto keto diet kids crafts kitchen makeovers lake house fixer upper Mother's Day Organization Outdoor painting paint party Pallet Projects pallet projects Pumpkins repurposed Repurposed & Upcycled Repurposed Projects Restaurant: Impossible Shopping Guides Thanksgiving upcycled Upcycled Projects Valentine's Day wood decor wood projects wood signs wreaths

Copyright © 2021 · Savory theme by Restored 316

Copyright © 2021 · Savory Theme on Genesis Framework · WordPress · Log in