• Home
  • About
    • Contact
  • DIY | Projects
    • For The Home
    • Organization
    • Gift Ideas
    • Holidays
      • Valentine’s Day
      • Spring
      • 4th of July
      • Halloween
      • Thanksgiving/Fall
      • Christmas
    • Weddings
    • For The Outdoors
    • Repurposed/Upcycled
    • For Kids
    • Crafts
    • Chalk Paint
  • Home Inspiration
    • Home Renovations
      • Lake House
      • Before & Afters
    • Kitchens
    • Bathrooms
    • Painting
    • Exterior
    • Design & Decor
    • Lighting
    • Accessories
    • Tips & Tutorials
    • Rekindled Spaces
      • Rekindled Spaces | Schedule a Consultation
      • Rekindled Spaces | Cabinet & Furniture Refinishing
      • Rekindled Spaces | Contact Us
      • Rekindled Spaces | Before & After Photos
  • My Favorites
    • Gift Guides
    • Shop
    • My Keto Journey
      • Easy Keto Meal Plans
      • Recipes

Diva of DIY

How to Make Your Own DIY Platform Bed with Storage

+13
Tweet
Share104
Share13
Pin43K
Stumble1
Shares 43K

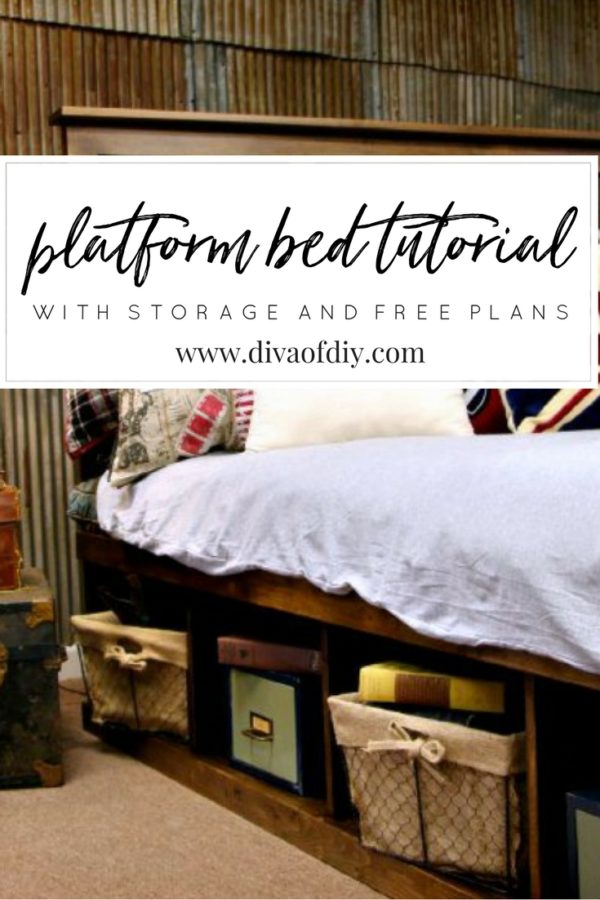
When designing this platform bed, I had a several key features I wanted to incorporate into the plans:

  • Clean lines
  • Lots of storage
  • A build-to-shape formula that anyone can duplicate once they have the basic knowledge.
  • A versatile design that allows you the flexibility to build anything from a daybed to a king using the same basic components
  • Using an American-made, formaldehyde-free hardwood plywood called PureBond® that can be found at The Home Depot


This platform bed frame is built from a series of boxes.  Learn to build the box…and you can build this bed.

I have provided affiliate links for your shopping convenience. If you buy something from clicking one of my links, I will get a commission from the sale. It will not cost you a penny more and allows me to keep sharing my ideas with you for free. You can see my full disclosure here. Thank you for supporting my blog!

This platform bed with storage is built from a series of boxes. Learn to build a box and you can build this bed. Sketches, plans and cut list included.

Using a table saw, rip the 3/4″ PureBond Plywood into the widths specified on the cut list.  I personally like to get all of my big cuts out of the way first.  If you don’t own a table saw or can’t fit the 4′ x 8′ pieces in your vehicle, you can have the hardware store cut the large pieces (Depending on the store, there may be a charge for cuts)

This platform bed with storage is built from a series of boxes. Learn to build a box and you can build this bed. Sketches, plans and cut list included.

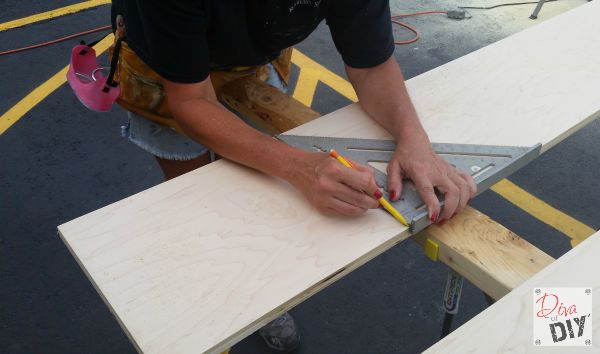
In this photo, I have one of the 11 7/8″ x 8′ pieces of PureBond plywood laying across the sawhorses.  I took a tape measure and placed a tack mark every 19 1/4″.  Next, using a square, I drew a straight line at each of the tack marks.

This platform bed with storage is built from a series of boxes. Learn to build a box and you can build this bed. Sketches, plans and cut list included.

Cut along the line using the square as a guide or the laser on the saw (if available)

This platform bed with storage is built from a series of boxes. Learn to build a box and you can build this bed. Sketches, plans and cut list included.

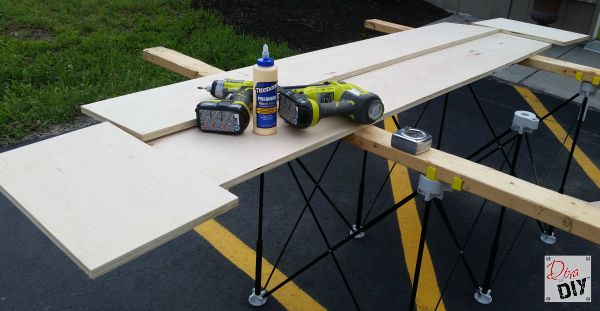
Once your pieces are cut, you are ready to assemble your first box.

This platform bed with storage is built from a series of boxes. Learn to build a box and you can build this bed. Sketches, plans and cut list included.

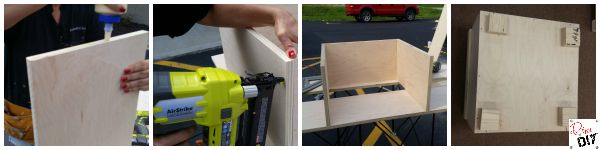
Build a Box for your Platform Bed (working on end box):

Step 1) Pick up the back panel and one of the side panels.  

Step 2)  Spread a conservative amount of wood glue to the edge of one of the side panels and butt it up perpendicular to the edge of the back panel.  

Step 3)  Use your nail gun to attach in several places.

Step 4)  Repeat on other side.

Step 5)  Using a small amount of glue and the nail gun, attach the top panel.

Step 6)  Using a small amount of glue and the nail gun, attach the bottom panel.

Step 7)  Attach feet to bottom of box (2″ x 4″ board cut: 3″)

Step 8)  Attach the 3″ x 19 1/4″ board to hold your filler panel

All that is left is the 1″ x 3″ trim board to finish off the box (optional) but I typically do that last after the other boxes are built.

Congratulations!!!  You just learned the foundation for making your very own platform bed!

Other Posts You Will Love

How To Build A Mantel Out Of An Old Barn Beam
How to Put a Useful Memo Chalkboard on a Cabinet D...
How to Make an Upholstered Monogram Letter
How to Paint Chairs
Restaurant: Impossible | DIY Mirror
+13
Tweet
Share104
Share13
Pin43K
Stumble1
Shares 43K
Pages: 1 2 3

Blog// DIY | Projects// Reader Favorites24 Comments

Become an insider and never miss a post!

« How to hack an old bar stool
How To Make A Repurposed Pet Bed Out of an Old End Table »

Comments

  1. Amy says

    01/22/2016 at 10:49 pm

    Your bed is gorgeous, great work! That wall is fabulous too.
    Reply
  2. Christine says

    03/13/2016 at 10:40 pm

    I can't find your tutorial or cut list on this post..... Can you please direct me?
    Reply
    • divaofdiy says

      03/14/2016 at 12:06 pm

      Christine thank you for letting me know. You are right, they are gone. Let me see what I can do... dang technology!
      Reply
    • divaofdiy says

      03/24/2016 at 4:30 pm

      Christine the link is back up with the cut list and sketches!
      Reply
    • Carlos says

      08/11/2017 at 6:44 pm

      I have a California king bed. Is your King cut list a standard or California king?
      Reply
      • divaofdiy says

        08/27/2017 at 4:00 pm

        It is for a standard king bed. You will need to adjust accordingly for a California king.
        Reply
  3. Ted Bonbrake says

    03/22/2016 at 11:23 am

    I, too would like to build this. My daughter really wants it. Any chance we could get that link refreshed?
    Reply
    • divaofdiy says

      03/24/2016 at 4:28 pm

      We have gotten the link back up. Sorry for any inconvenience! I would love to see a picture of your final project!
      Reply
  4. Surfer says

    04/28/2016 at 6:18 am

    Planing on building this for my studio. Just a question. What is the importance of the feets? I rather not have any so I know no bugs are under there.
    Reply
    • divaofdiy says

      04/28/2016 at 3:19 pm

      The feet are just for looks. I would love to see your project when you are finished! I love this bed!
      Reply
  5. Shelley says

    06/10/2016 at 11:48 am

    Love the bed! Can you tell me what you have on your walls ~ it looks really cool! Thanks
    Reply
    • divaofdiy says

      06/12/2016 at 8:52 pm

      It is galvanized Tin! I love it!
      Reply
  6. Ashley says

    07/14/2016 at 2:47 pm

    How do I alternate the plan for a full size mattress?
    Reply
    • divaofdiy says

      07/15/2016 at 2:08 pm

      The dimensions for a twin and full size bed are in the cut list.Here is the direct link to that. http://divaofdiy.com/diy-platform-bed-with-cut-list/
      Reply
  7. Jason Cox says

    08/03/2016 at 12:46 pm

    I'm just curious as to the strength of the boxes. You're using a butt joint, which is the weakest of joints, to hold the wood at the corners. Does the strip along the backside and the backing itself make sturdy it enough to where it won't collapse?
    Reply
    • divaofdiy says

      08/15/2016 at 1:13 pm

      I have not had any problems with my the bed. It has been holding up fine and have never had anyone who has made it tell me of any problems.
      Reply
  8. Patty Wherley says

    08/18/2016 at 10:56 am

    Do you have a tutorial for your galvanized tin wall? I love it!
    Reply
    • divaofdiy says

      08/18/2016 at 12:52 pm

      I do not but will be doing one with my lake house series. I did a tin wall in the game room there! I send out an email once a week with updates!
      Reply
  9. Tammy Smith says

    09/07/2016 at 11:21 am

    What size bed is this? I'm needing plans for a Queen size.
    Reply
    • divaofdiy says

      09/07/2016 at 12:33 pm

      This is a queen size!
      Reply
  10. ervina ann says

    01/17/2017 at 8:38 pm

    wow.... this bed is sooo coolll..!! I will beg my hubby to make one!
    Reply
    • divaofdiy says

      01/21/2017 at 10:16 pm

      Thanks! You should do it together!
      Reply
  11. Jasmine says

    03/15/2017 at 10:52 pm

    Can this be disassembled for a move?
    Reply
    • divaofdiy says

      03/16/2017 at 11:02 am

      Yes. That is the what I wanted to create, a bed that has stand alone parts for moving. Thanks for the question!
      Reply

Leave a Reply Cancel reply

Your email address will not be published. Required fields are marked *

Looking For Something?

Shop Amazon!

My Latest Videos

Do you struggle with choosing paint colors for your home?

Trying to select them off of small paint strip can be a daunting task.  DOWNLOAD THIS FREE E-BOOK full of professional tips for choosing the perfect paint colors…
THE FIRST TIME!

You have Successfully Subscribed!

Tags

4th of July bathroom makeover ideas Chalk Paint Christmas Craft Projects design tips Dorm Rooms easter easy keto recipes Fall decorating Father's Day fixer upper furniture Furniture Rehabs Gift Ideas Halloween holiday decor Home Decor home improvement home renovations keto keto diet kids crafts kitchen cabinets kitchen makeovers lake house fixer upper Mother's Day No-sew projects Organization Outdoor painting Pallet Projects pallet projects Pumpkins repurposed Repurposed & Upcycled Repurposed Projects Restaurant: Impossible Shopping Guides Thanksgiving upcycled Upcycled Projects Valentine's Day Weddings wreaths

Copyright © 2018 · Savory theme by Restored 316