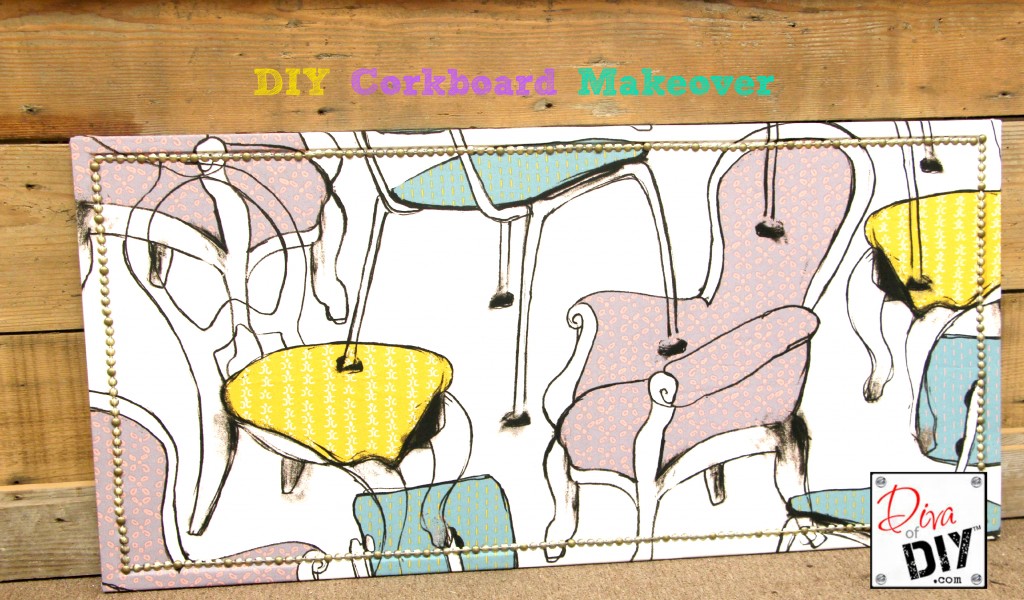
Do you have a ugly corkboard that’s just laying around? Not sure what to do with it because it’s so…well…BORING?

Let’s take care of all those BLAH corkboards out there with this super simple and fabulous project. Not only are you able to keep something that is useful, but, all you are doing is bringing life to it. This corkboard will still function when you are done with it, it will just be fabulous!
If you don’t have a corkboard laying around your home you can pick these up every weekend at a local garage sale. Please don’t pay anymore than $2-$3 for a large one!
Supplies
- Corkboard
- Fabric (I got this amazing fabric at Ikea)
- Scissors
- Spray Adhesive
- Staple Gun
- Upholstery tacks (optional) I buy the continuous roll like this https://www.amazon.com/gp/product/B0066GZ5D4/ref=oh_aui_detailpage_o06_s00?ie=UTF8&psc=1
Directions

On a flat smooth surface lay your fabric design face down. If it is wrinkled…iron it first!
Spray the face of the corkboard with spray adhesive. This will make sure the fabric doesn’t move while you are stapling into place.
Place the corkboard on top of the fabric with the corkboard face down.
Flip the corkboard over to make sure the fabric design lines up nicely with the corkboard.

Place the corkboard face down and begin to fold your fabric to the back of the corkboard as if you were wrapping a present.
Staple the fabric to the back of the corkboard on all 4 corners and along the sides.
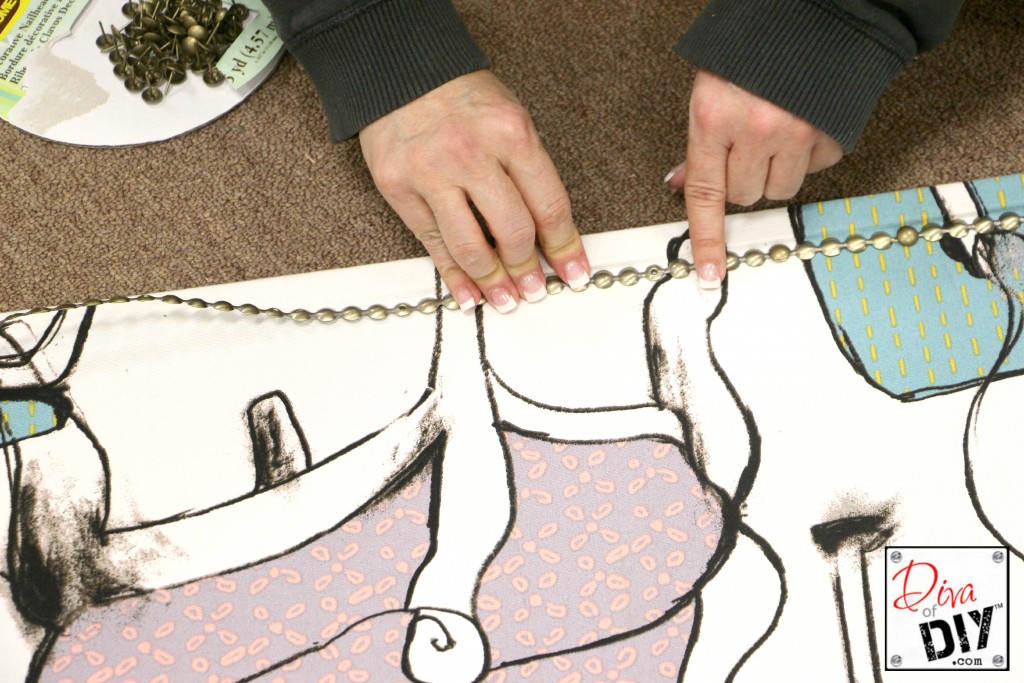
Now add some detail using string pearls, decorative nails, rope, anything you have laying around would work. This step isn’t required, but, a nice element!
- Corkboard
- Beautiful Fabric, adding 1″ all around
- Scissors
- Spray Adhesive
- Staple Gun
- On a flat smooth surface lay your fabric design face down.
- Spray the corkboard with glue. This will make sure the fabric doesn’t move while you are stapling into place.
- Place the corkboard on top of the fabric with the corkboard face down.
- Flip the corkboard over to make sure the fabric design lines up nicely with the corkboard.
- Place the corkboard face down and begin to fold your fabric to the back of the corkboard as if you were wrapping a present.
- Staple the fabric to the back of the corkboard on all 4 corners and along the sides.
- Now add some detail using string pearls, decorative nails, rope, anything you have laying around would work. This step isn’t required, but, a nice element!
Ya’ll inspire me and I LOVE to see the work that you’ve created. Feel free to share with me on Instagram, Twitter or Facebook. And as always, be sure to follow Diva Of DIY on Pinterest and sign up for our FREE Newsletter to receive the latest projects delivered straight to your inbox!